
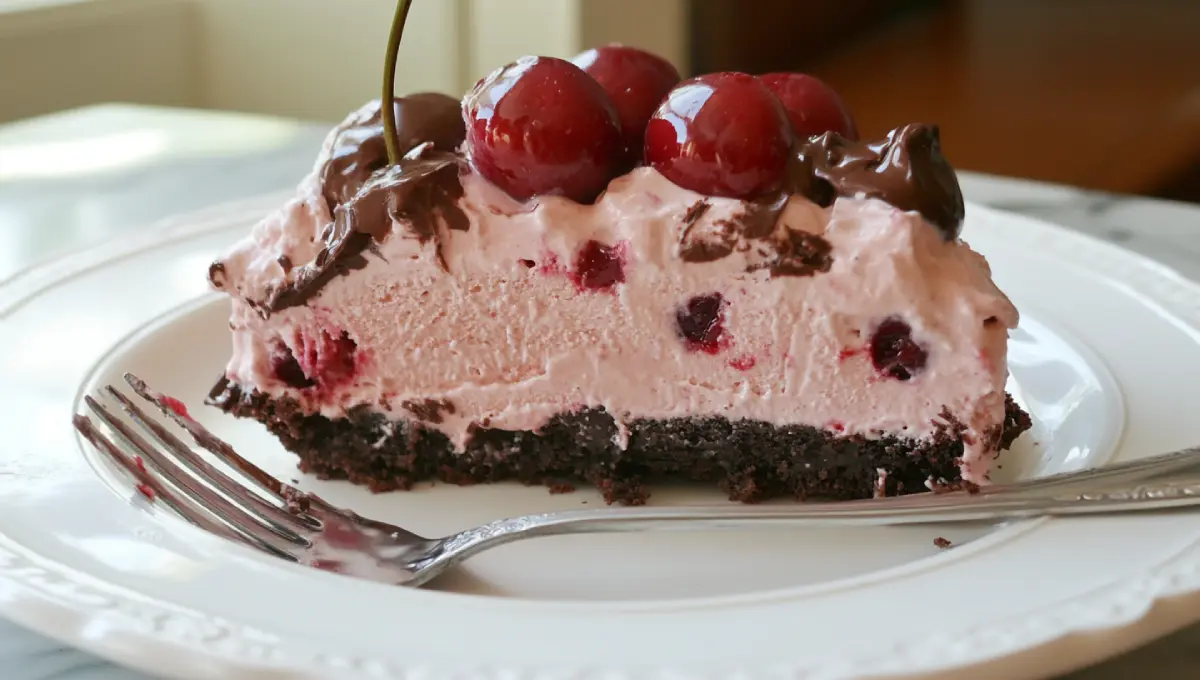
Ice cream cakes bring joy to any occasion. But when you combine rich chocolate, juicy cherries, and creamy ice cream, you get a dessert that’s absolutely irresistible. Whether you’re celebrating a birthday, a summer party, or just craving a sweet treat, this Cherry Chocolate Ice Cream Cake is a perfect choice.
This homemade frozen delight combines a crunchy chocolate cookie or brownie base, luscious cherry ice cream, swirls of fudge sauce, and a smooth vanilla layer. Topped with whipped cream and fresh cherries, it’s a show-stopping dessert that’s surprisingly simple to make. This Cherry Chocolate Ice Cream Cake is a nostalgic fusion of rich chocolate layers and tart cherry sweetness perfect for summer celebrations.
Table of Contents
Cherry Chocolate Ice Cream Cake
What Makes This Ice Cream Cake Special?
This isn’t just any frozen dessert. It’s a perfect balance of flavors and textures:
- Crunchy base – A layer of crushed chocolate cookies or fudgy brownie.
- Creamy ice cream – Smooth, rich, and infused with real cherry pieces.
- Chocolate swirls – Fudge sauce adds an extra burst of sweetness.
- Fresh cherries – Juicy bites of fruit for a refreshing contrast.
Each bite delivers crunch, creaminess, and a burst of cherry flavor, making it irresistibly delicious. If you’re searching for a no-bake dessert that still wows the crowd, this Cherry Chocolate Ice Cream Cake delivers both flavor and presentation.
The History Behind Chocolate and Cherry Desserts
The cherry and chocolate combo is a match made in dessert heaven. It’s most famous in Black Forest Cake, a traditional German treat with chocolate layers, cherries, and whipped cream. This ice cream cake draws inspiration from that classic pairing, but with a frozen twist!
Even beyond Black Forest Cake, chocolate and cherries have been paired together for centuries in everything from truffles to cheesecakes. The natural sweetness of cherries enhances the richness of chocolate, creating an indulgent contrast that keeps people coming back for more.
Why You’ll Love This Recipe
This Cherry Chocolate Ice Cream Cake is not only delicious but also:
✅ Easy to make – No complicated steps or fancy equipment needed.
✅ Perfect for any occasion – Birthdays, summer parties, or a weekend treat.
✅ Make-ahead friendly – Prepare in advance and freeze until needed.
✅ Customizable – Use store-bought or homemade ice cream, add nuts, or switch up the flavors.
One bite of this Cherry Chocolate Ice Cream Cake and you’ll understand why it’s quickly becoming a fan favorite on our recipe list.
Ingredients You’ll Need
Creating a Cherry Chocolate Ice Cream Cake from scratch is easier than you might think. The secret lies in using the best ingredients to bring out the rich chocolate flavor and fresh cherry goodness. Here’s a breakdown of everything you need for each layer of this indulgent dessert.
Key Ingredients for the Crust and Layers
A well-structured cake starts with a solid base and deliciously creamy layers. Here’s what you’ll need:
- Chocolate Cookie or Brownie Base – Crushed chocolate sandwich cookies (like Oreos) mixed with melted butter work well. For a richer base, a fudgy brownie layer is a great alternative.
- Cherry Ice Cream – You can use store-bought cherry or cherry vanilla ice cream. For a more intense flavor, making your own with fresh cherries is a fantastic option.
- Vanilla Ice Cream – A classic contrast to the cherry flavor. If you prefer, swap this for chocolate or even white chocolate ice cream.
- Chocolate Chips – Mini semisweet chocolate chips add crunch and extra bursts of chocolate flavor.
- Fudge Sauce – This adds ribbons of chocolate throughout the ice cream layers, making each bite extra indulgent.
- Whipped Cream (Optional) – If you want a decorative and creamy topping.
- Fresh Cherries – The finishing touch! Whole cherries on top make the cake look elegant and delicious.
For an alternative base, check out this guide to making the perfect cookie crust on AllRecipes.
Choosing the Best Cherries
Cherries are the star ingredient in this dessert, so picking the right ones matters. Here’s what to keep in mind:
- Fresh Cherries – If they’re in season, go for fresh cherries. They add the best natural sweetness and texture.
- Frozen Cherries – A great option if fresh ones aren’t available. Just be sure to drain excess water before using.
- Canned Cherries – Avoid cherry pie filling, as it’s too sweet and syrupy. Instead, use canned cherries in juice for a better balance of flavor.
If you want to learn more about selecting and preparing cherries for baking, check out Food Network’s cherry dessert guide.
Alternative Ingredient Options
Want to make this dessert fit your dietary needs? Try these variations:
- Dairy-Free or Vegan Version – Use dairy-free chocolate cookies, plant-based ice creams, and coconut whipped cream.
- Gluten-Free Option – Swap regular cookies or brownies for a gluten-free alternative.
- Low-Sugar Option – Use sugar-free cookies, unsweetened chocolate, and a lower-sugar ice cream.
Step-by-Step Instructions
Now that we have our ingredients ready, it’s time to start assembling this heavenly ice cream cake. Follow these steps for a perfectly layered dessert.
Step 1: Making the Base
- If using a cookie crust – Crush 16 chocolate sandwich cookies in a food processor until fine crumbs form. Mix with ¼ cup melted butter and press into the bottom of a 9-inch springform pan. Freeze for 15 minutes.
- If using a brownie base – Prepare and bake brownie batter in the same pan. Let it cool completely before adding the next layers.
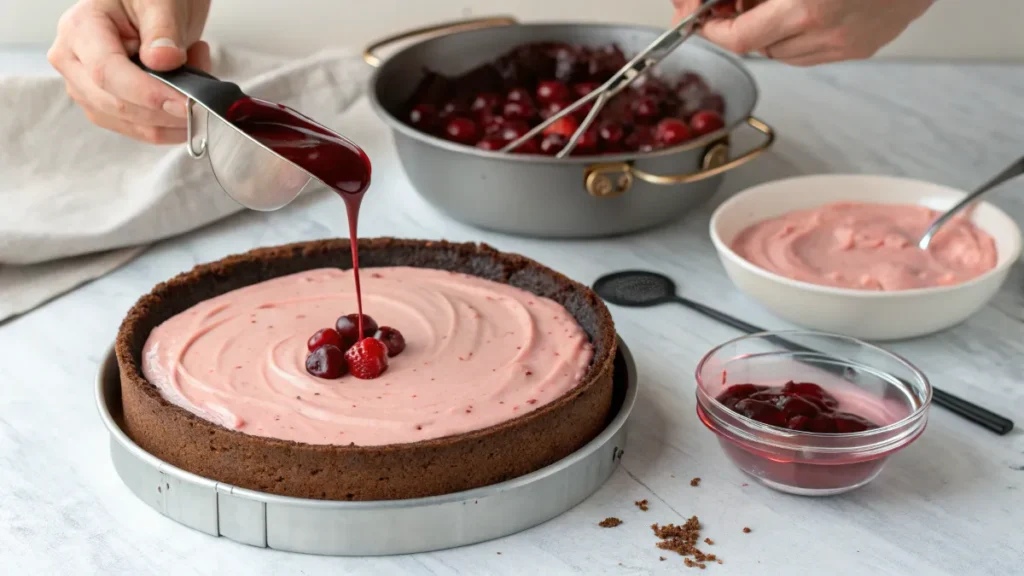
Step 2: Preparing the Cherry Ice Cream Layer
- Let cherry ice cream soften for about 10 minutes until spreadable.
- Spread the softened ice cream evenly over the chilled crust.
- Sprinkle chopped cherries on top. Lightly press them into the ice cream.
- Freeze for 30 minutes to let the layer firm up.
Step 3: Adding the Vanilla Ice Cream and Chocolate Elements
- Soften vanilla ice cream as you did with the cherry ice cream.
- Spread it evenly over the frozen cherry layer.
- Drizzle fudge sauce in small spoonfuls over the vanilla layer and gently swirl it with a knife.
- Sprinkle mini chocolate chips on top and press them lightly into the ice cream.
- Freeze the entire cake for at least 8 hours or overnight.
Step 4: Freezing and Assembling the Cake
- Before serving, let the cake sit at room temperature for 5–10 minutes for easier slicing.
- Remove the cake from the springform pan carefully.
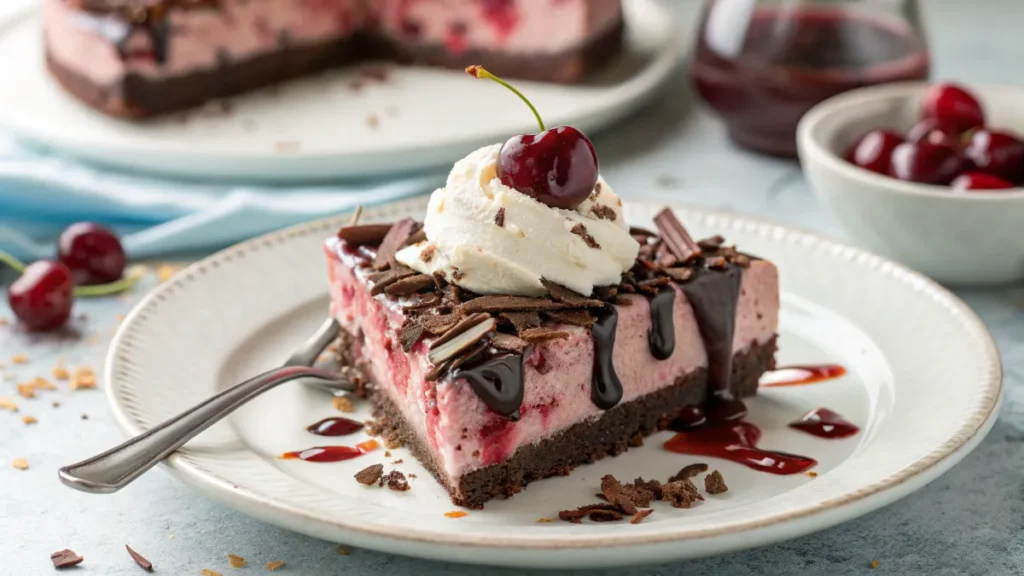
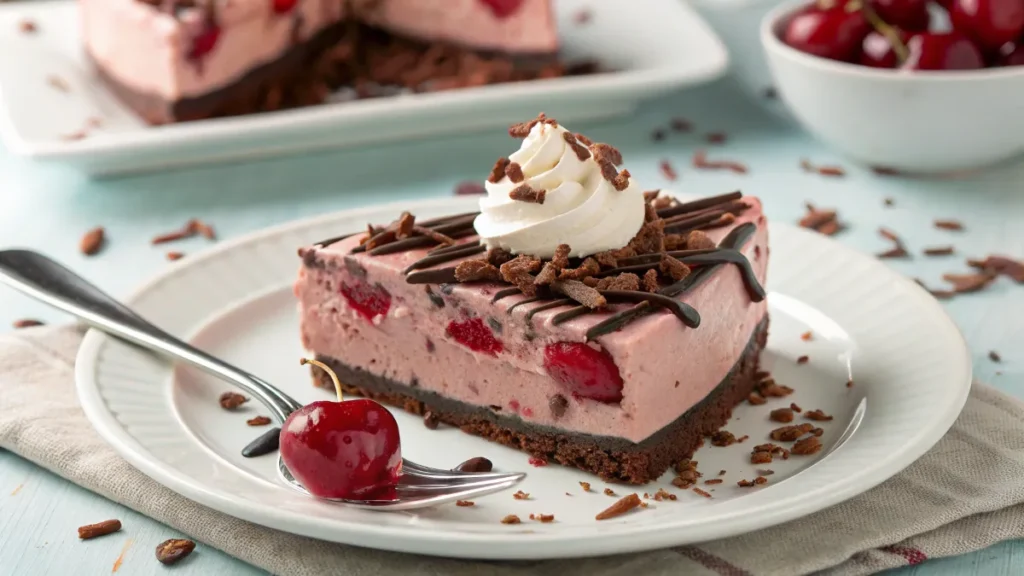
- Garnish with fresh cherries and a dollop of whipped cream if desired.
This Cherry Chocolate Ice Cream Cake is not only easy to prepare, but it’s also a stunning centerpiece for birthdays, holidays, or just a weekend treat. You can prepare this Cherry Chocolate Ice Cream Cake ahead of time, making it a stress-free dessert option for any occasion.
Serving and Presentation Tips
Once your Cherry Chocolate Ice Cream Cake is frozen and ready, it’s time to make it look as delicious as it tastes. The right presentation can turn this homemade dessert into a showstopper.
Customize your Cherry Chocolate Ice Cream Cake by swapping in your favorite ice cream flavors or adding crushed cookies for extra crunch.
How to Remove the Cake from the Pan Perfectly
Getting a clean, smooth edge on your cake is easy if you follow these steps:
- Loosen the edges – Run a warm knife around the inside of the springform pan.
- Use a hot towel – If the cake sticks, wrap a warm, damp towel around the pan for 30 seconds.
- Lift the pan carefully – Slowly remove the sides of the pan to reveal the layers.
A well-set ice cream cake should hold its shape without melting too quickly.
What makes this Cherry Chocolate Ice Cream Cake so irresistible is the perfect harmony between creamy textures and bold, fruity chocolate flavors.
Garnishing for a Beautiful Look
The final touches make all the difference. Try these decorating tips:
- Fresh cherries – Arrange them on top for a natural, elegant look.
- Chocolate shavings – Use a vegetable peeler to create chocolate curls.
- Whipped cream – Pipe swirls around the edges for a bakery-style finish.
- Drizzled fudge sauce – A little extra chocolate never hurts!
These small details make your cake look as incredible as it tastes. Kids and adults alike will fall in love with the vibrant look and rich taste of this Cherry Chocolate Ice Cream Cake. The layered beauty of this Cherry Chocolate Ice Cream Cake makes it just as eye-catching as it is delicious.
Pairing Suggestions
Make your dessert even better with the right drinks and sides. Here are some great pairings:
- Coffee or espresso – The bitterness of coffee balances the cake’s sweetness.
- Cherry-flavored cocktails – A cherry mojito or sangria adds a fun twist.
- Vanilla bean ice cream – A scoop on the side doubles the indulgence.
If you’re as obsessed with flavor mashups as we are, this Cherry Chocolate Ice Cream Cake is just the beginning of a dessert adventure. Once you’ve tried it, you’ll love pairing it with something unexpected like a refreshing Cookies and Cream Frappuccino or a festive Valentine’s Mini Donuts Bouquet for your next celebration. And if you want to balance out your sweet tooth with a savory kick, check out our sweet-and-smoky Kansas City BBQ Ribs or the indulgent Gooey Grilled Pizza Cheewich—both are crowd-pleasers that bring big flavor with minimal effort.
Looking to plan a full weekend menu? Start your morning off with Cheesy Ham and Egg Breakfast Sliders and wind down with a cozy dinner like Chicken Sausage Orzo or our viral Teriyaki Salmon Bowl. If you’re craving something punchy and quick, the zesty Teriyaki Glazed Salmon or learning How Long to Cook Frozen Chicken in a Crockpot might just save the day. Don’t forget a simple snack like the Classic Cucumber Sandwich or a nostalgic treat like Strawberry Banana Pudding. And for a cheeky cocktail hour, the playful Pink Panties Cocktail or a rustic Brown Butter Irish Soda Bread will round off your cherry-chocolate journey with the perfect twist.
If you enjoy making frozen treats like this Cherry Chocolate Ice Cream Cake, you’ll love our collection of delicious homemade dessert recipes packed with easy, crowd-pleasing ideas!
Recipe: Cherry Chocolate Ice Cream Cake
Now, let’s go through the complete step-by-step recipe to make your own Cherry Chocolate Ice Cream Cake at home.
Ingredients:
For the Crust:
- 16 chocolate sandwich cookies, crushed
- ¼ cup melted butter
For the Ice Cream Layers:
- 1 quart (4 cups) cherry ice cream, softened
- 1 cup chopped cherries (fresh or frozen)
- 1 quart (4 cups) vanilla ice cream, softened
- ½ cup mini chocolate chips
- ½ cup fudge sauce
For Garnish:
- Sweetened whipped cream
- 12 fresh cherries with stems
Instructions:
Step 1: Prepare the Base
- Preheat oven to 350°F if using a brownie base.
- Crush chocolate sandwich cookies and mix with melted butter.
- Press into the bottom of a 9-inch springform pan and freeze for 15 minutes.
- If using brownies, bake and let them cool before adding the ice cream.
Step 2: Add the Cherry Ice Cream Layer
- Let cherry ice cream soften for 10 minutes.
- Spread it evenly over the chilled crust.
- Sprinkle with chopped cherries, then freeze for 30 minutes.
Step 3: Add the Vanilla Ice Cream Layer
- Let vanilla ice cream soften slightly.
- Spread it over the cherry layer.
- Drizzle fudge sauce and swirl lightly with a knife.
- Sprinkle mini chocolate chips on top.
Step 4: Freeze and Serve
- Freeze the cake for at least 8 hours or overnight.
- Before serving, let it sit at room temperature for 5 minutes.
- Remove from the pan, garnish with whipped cream and fresh cherries, then slice and enjoy!
With just a few ingredients and a little patience, you can whip up this stunning Cherry Chocolate Ice Cream Cake at home.
Tips and Tricks for the Best Ice Cream Cake
A perfectly made Cherry Chocolate Ice Cream Cake isn’t just about following a recipe it’s also about knowing the right tricks to make it smooth, creamy, and beautifully layered. Here are some expert tips to help you get the best results every time. If you enjoy frozen desserts, this Cherry Chocolate Ice Cream Cake will quickly earn a permanent spot in your go-to recipe collection.
How to Keep the Layers Even
One of the biggest challenges when making an ice cream cake is ensuring that the layers remain even and visually appealing. Here’s how to do it:
- Use a springform pan – This makes it easy to remove the cake without damaging the layers.
- Freeze between layers – Give each layer time to firm up before adding the next. This prevents them from mixing.
- Smooth with a spatula – Use a flat spatula to spread each layer evenly for a professional finish.
Preventing Ice Crystals in Homemade Ice Cream Cakes
Nobody wants an icy or grainy texture in their ice cream cake. Follow these simple steps to avoid freezer burn and ice crystals:
- Cover tightly – Wrap the cake in plastic wrap or store it in an airtight container.
- Avoid temperature changes – Don’t leave the cake out for too long. Melting and refreezing cause ice crystals to form.
- Use high-fat ice cream – Lower-fat ice creams contain more water, which can lead to iciness.
Making a Boozy Version for Adults
Want to take your Cherry Chocolate Ice Cream Cake to the next level? Try adding a splash of flavor with cherry liqueur or Kirsch. Just mix a tablespoon of liqueur into the cherry ice cream before freezing. It enhances the cherry flavor and gives the dessert a gourmet touch!
Don’t be surprised if guests ask for seconds this Cherry Chocolate Ice Cream Cake disappears fast!
Storage and Leftover Tips
Once you’ve made this delicious cake, you’ll want to store it properly to keep it fresh and creamy for as long as possible. Here’s how.
How to Store Ice Cream Cake Properly
Since ice cream cakes are highly sensitive to temperature changes, you’ll need to store them the right way to prevent melting or freezer burn.
- Use an airtight container – This helps maintain texture and prevents the ice cream from absorbing freezer odors.
- Wrap tightly – If you don’t have a container, wrap the cake in plastic wrap and aluminum foil for protection.
- Store at the right temperature – Keep your freezer at 0°F (-18°C) or lower for the best consistency.
With these steps, your Cherry Chocolate Ice Cream Cake will stay fresh for up to one week.
How to Re-Serve Leftover Cake
If you have leftovers, don’t just cut and serve immediately here’s how to enjoy them in the best way possible:
- Let the cake sit at room temperature for 5–10 minutes before slicing. This softens the ice cream just enough for a perfect texture.
- Use a sharp knife warmed under hot water to get clean slices. Wipe between cuts for a smooth finish.
- Enjoy your leftover cake as-is, or get creative by serving it with extra cherries, chocolate drizzle, or a scoop of vanilla ice cream.
Frequently Asked Questions (FAQs)
Making the perfect Cherry Chocolate Ice Cream Cake might bring up some questions. Below are answers to some of the most common ones to help you get the best results.
1. How long does ice cream cake last in the freezer?
A homemade Cherry Chocolate Ice Cream Cake can last for up to one week if stored properly. To prevent freezer burn, wrap it in plastic wrap and store it in an airtight container. If you plan to keep it longer, individual slices can be wrapped separately and stored for up to two weeks.
2. Can I use frozen cherries instead of fresh ones?
Yes! Frozen cherries work well in this recipe, but be sure to thaw and drain them before adding them to the ice cream. Excess moisture from frozen fruit can create ice crystals in the cake, which affects the texture.
3. How do I cut an ice cream cake without making a mess?
For clean slices, use a sharp knife dipped in warm water. Wipe the blade between cuts to prevent layers from smearing. Also, let the cake sit at room temperature for 5–10 minutes before slicing.
4. What’s the best way to soften ice cream for layering?
The best method is to let the ice cream sit at room temperature for 10–15 minutes until it’s spreadable but not runny. Avoid microwaving it, as this can melt the edges too quickly, making layering uneven.
Conclusion: A Must-Try Dessert for Any Occasion
There’s nothing quite like a homemade Cherry Chocolate Ice Cream Cake to impress your family and friends. The combination of rich chocolate, creamy cherry ice cream, and swirls of fudge sauce creates a perfectly balanced frozen treat that’s both indulgent and refreshing. Whether you’re making it for a birthday, a summer celebration, or just to satisfy your sweet cravings, this no-bake ice cream cake is sure to be a crowd-pleaser.
The best part? It’s easy to customize! You can swap in your favorite ice cream flavors, add extra toppings, or even make a boozy version for adults. With the right storage and serving techniques, you can enjoy this delightful dessert for days.
If you loved this recipe, be sure to check out more delicious dessert ideas on our website. Browse our Dessert Recipes for more mouthwatering treats to try at home! 🍒🍫🍦